Docker Tutorial Part 4 -> Understanding components: docker-machine, Dockerfile, Images and Containers

In our previous blog post Docker setup and installation on Ubuntu , we have done installation of docker. Now before diving deep in to hands on of Docker, its time to understand what are all components or terminology.

Following are some major components of Docker-

  1. Docker-Machine
  2. Docker Engine
  3. Dockerfile
  4. Docker Images
  5. Docker Containers

Docker-Machine – This can also be referred as Docker Host. If you are working on a Linux machine then your Linux system itself is a Docker-machine / Docker host. But if you are working with Boot2Docker on windows, then your Linux VM inside Oracle virtual box is the docker-machine. In case of Windows(Boot2Docker), you can have multiple docker-machine and can also create new using below command-

docker-machine create --driver virtualbox <suitable machine name>

Docker Engine – Docker engine is the core of Docker, it is the main software/package which drive all docker commands and enable user to create images and containers. This is a lightweight and powerful open source containerization technology combined with capabilities to build and ship your applications

DockerFile – Dockerfile is a plain text file with no extension. It has series of  instructions which needs to be perform to create a docker image. Instruction are some docker specific commands which when executed in sequence generates a docker image. If you have a dokerfile, you can easily create an image from it with a custom name. Every instruction when executed, stored in a layer. A sample dockerfile with python looks like below-

FROM ubuntu:14.04
RUN apt-get update && \
apt-get install -y python python-dev python-pip python-virtualenv && \
rm -rf /var/lib/apt/lists/*
WORKDIR /data
CMD [“bash”]

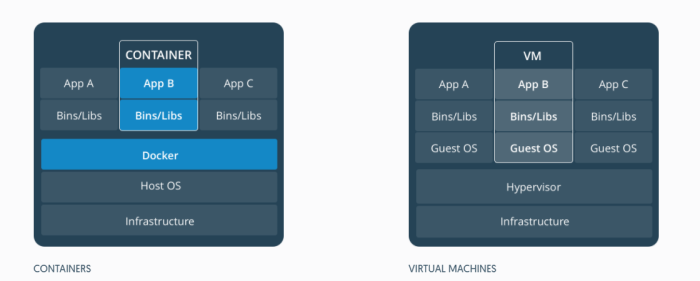
Docker images – Docker image is a blue print of what you need in a container. Docker image is build up from a series of layers. Each layer represents an instruction in the image’s dockerfile. Each layer except the last one is read-only. To understand the concept at high level, you can consider an image as a Class and container as object of that class. Object is a run time entity similar to container. Like a class can have many objects of it, An image can have multiple containers out of it.

Docker container – Docker container is a lightweight execution environment to build and ship your application. This is just your docker image in action.

Lets understand the difference with an analogy. Consider your Dockerfile as some Abc.java file. Now when you build/compile Abc.java file you get .class file (docker image). Now when you can create multiple objects(containers) of class Abc.java(docker image), and these objects can be referred as Docker containers. So in the end the run time entity on which you will actually work is Container.

In the next blog post , we would be learning about running your local source code in to container

To know more in details, hands-on and for personal / corporate training please reach out to – gauravtiwari91@yahoo.com

Docker Tutorial Part 1 ->Docker technology overview: How is it different from virtual machines

Before we start blindly follow the docker training program and start learning it. Lets understand why we should learn, why we need it. What this technology is and how it works.

What is Docker – All applications have their own dependencies, which include both software and hardware resources. Docker is an open source platform for developers, QA etc. Its a mechanism that helps in isolating the dependencies per each application by packaging them into a single unit called container. Containers are safe to use and deployed easily compared to previous approaches

How containers are different as a concept – Lets understand the difference by an analogy. Consider your virtual machine as a house and container as an apartment.

Houses (Virtual machines) are fully self-contained which has its own infrastructure- plumbing, electricity, water supply etc. On a majority all house would have at least a bedroom, living area, bathroom and kitchen. Still, even if I am trying to bought a house with only a room, I would end up buying more than what i need in a house.

Apartments (The containers) are built around shared infrastructure. The apartment building (Docker host) shares plumbing, electricity, water supply etc. They are also offered in different sizes as per your need. You also have to pay for only those services which you want to use.

Also maintenance cost for house will always be higher than an apartment.

So with containers, you share the underlying resource of the Docker host and use only the software which you need to run your application.

And with virtual machines- its just opposite, you are going to have full operating systems and default programs comes with it.

Now when we have understand the concept, lets go a little technical. Consider the building as docker-host and builder as docker-engine in below explaination-

Docker containers versus Virtual Machines – Virtual machines have full OS with its own memory management with the overhead of virtual device drivers. In an virtual machine, valuable resources are emulated for the guest OS and Hypervisor, which makes it possible to run many instances of one or more operating systems in parallel on a single machine

While Docker containers are executed with Docker engine rather than a Hypervisor, therefore containers are smaller than virtual machines and enable faster startup and better performance, great compatibility due to sharing of the host’s kernel. Architecture level visual difference is as below – containersvsVM

So to optimize our SDLC and reduce time spent in test script execution,overhead of maintaining the execution/deployment environments, We should really go for container technology.

Now we know what docker is and why we should use it. To know more in details and for personal / corporate trainings please reach out to – gauravtiwari91@yahoo.com


Docker Training Program – [Build, Ship, and Run Any App, Anywhere]

In the automation driven industry, we are way more advance in automating our test cases, deployments etc. but automating your infrastructure, setup of environments is still a pain. We all have seen situations when something is working on a machine but it is not working on other machine. Sometimes a QA files a OS specific defect , but developer is no longer able to re-produce. So solution of all these problem is one single thing – DOCKER

I have recently started working on Docker and utilized this very efficiently in Automation Testing and Dev-ops; specially in setting up the execution environment. Following are the major benefit of docker-

  • Build, Ship, and Run Any App / automation script , Anywhere
  • Setup of execution environment for dev/testing is a matter of seconds
  • Docker hub – A cloud of docker images which provides image for every possible software you are looking for, and you can also push your own images and use it form anywhere
  • Continuous integration and fast deployment

Going forward, I would be going through following topics-

  1. Introduction to Docker container technology, how is it different from virtual machines
  2. Installing and Setting up Docker on Windows
  3. Installing and Setting up Docker on Linux (Ubuntu)
  4. Understanding Docker components: docker-machine, Dockerfile, Images and Containers
  5. Hooking your local source code in to container
  6. Understanding major docker commands and shortcuts
  7. Executing your local selenium test inside the container
  8. How to use Selenium-Grid with docker
  9. Building custom images from dockerfile
  10. How to minimize the size of your docker images
  11. Managing your containers with docker compose
  12. How to scale your execution environment with docker and multi-threadinng
  13. Using docker containers as Jenkins slaves
  14. Docker on AWS

So far, I will  be writing about each topic mentioned above. I will also keep adding new topics to the list. Stay tuned to this post for all docker related stuff.

You can reach out to – gauravtiwari91@yahoo.com for more details and personal training with live projects.

Shifting left with DevOps and Continuous Integration

Adopting Continuous delivery helps to achieve rapid application development throughout the software application life cycle. It is a methodology, a mindset change,a shift-left approach and a leadership practice to streamline manual processes and enforce consistency and repeat-ability in software delivery pipeline. This is about enhancing collaboration and shared matrices and processes across Developers, QA and Ops team.

Read time – 10 minutes

In order to establish a Continuous Delivery environment, the most important requirement is the implementation of an automated Continuous Integration (CI) System. The CI process involves all stages – right from code commits to a version control system (done on the CI server) that serves as a kick off for a build to compile, run tests, and finally package the code. DevOps is playing a major role in going towards defect-preventive approach.

This blog will demonstrate the steps and advantages of implementing a Continuous Integration System using Jenkins and a group of virtual machines. You can utilize your CI system for automatic infrastructure setup and execution of suitable automated scripts whenever a new build or commit happens in that automation script code.

Highlights

  1. Setting up a Jenkins Master machine
  2. Setting Jenkins slaves for distributed execution
  3. Creating new Jenkins job for new scripts
  4. Creating execution pipeline for automating the build steps
  5. Scheduling script execution


  • Setting up a Jenkins Master Machine – Installation of Jenkins is very easy; it is just about executing a jar file or executable. Once this is up, it can be accessed from any machine available on that network through a web browser. Jenkins Master is responsible for re-directing all commands and execution to Slave machines. For set up instructions, go through Setting up Jenkins in 5 minutes
  • Setting Jenkins Slave for distributed execution – Jenkins Slave machine can be a real machine, a virtual machine or a dockerized container which has capability of an operating system. Jenkins slave can also be set up by just executing a jar file and registering that machine as a slave against Master Jenkins machine. When Jenkins master receives instructions, it processes that and decides which script would be executed on which slave machine. So if multiple slaves are connected, execution can be done in distributed manner and will result in multi processing + multi threading of execution.
  • Creating new jobs for script execution – A job in Jenkins is about defining a series of action for successful execution of script. First it fetches the latest script code from sub-version, and then it builds that code on some selected slave or master (which is decided by Jenkins Master). Once the code is built on slave machine, Scripts get started and executed. usually, we use Selenium, Java and Maven for automated build process. Once a job is created, it has a web URL. This web URL is helpful in sharing execution results, build info etc.
  • Creating execution pipe line – Execution pipe line is a visual representation of different job executions in sequence. This helps in automating the whole process of script execution. So once all Jenkins jobs are set up, you can decide the order of their execution based on the type of script e.g. Smoke, Regression, release validation, web services test etc. So it creates a pipe line of execution which has a single trigger point. That trigger is initiated whenever a new build / release happen on platform or there is any requirement of executing it. Once a single job in this pipeline gets finished, it automatically triggers the next job in the pipe line. QA/Developer keeps getting the continuous feedback of automated results, which helps us in identifying the defects. Below diagrams represents a pipe line which shows headless scripts execution which is done using plugin – Build pipeline plugin

build-pipeline

  • Scheduling script execution – Jenkins job is that these can be scheduled for future executions and can provide results of nightly test build script executions. It helps a lot of time spent in manual triggering and monitoring of execution and enhance the automated process of script execution. There are two ways to do this-
  1. Jenkins plugin for scheduling – Build schedule plugin
  2. Select the option for build periodically in build steps and define a regular expression which is a 5 digits separated number define the execution timing and cycle. for e.g. below images showing that this job will be executed at 22:00 (10:00 PM) daily.schedule

I have setup this kind of infrastructure for automated test script execution, Next step is to do the same at build deployment level. I will keep posting more stuff related to Devops and continuous integration. Happy Testing 🙂