Docker Tutorial Part 3 -> Setup and installation on Ubuntu

Installing docker on Linux is as simple as installing any other Linux package, We don’t require the whole Docker toolbox for working with docker on Linux.

In this blog post, I will be talking about installing community edition installation of Docker.

To install Docker, you need the 64 bit version of either one of below Ubuntu-

  • Xenial 16.04 (LTS)
  • Trusty 14.04 (LTS)
  • Yakkety  16.10

Uninstall older version of Docker – Older version of Docker called docker or docker-engine. if you have these then uninstall them, otherwise skip this part

sudo apt-get remove docker docker-engine

Install Docker – You can install the Docker in different ways, as per your needs

  1. Setup docker repositories and install from them – this is easy in installation and upgrades (recommended approach)
  2. Download the DEB package and install it manually and also manage upgrades manually (prefer when lack of internet access)

Install using Repository – If you are doing the setup for the first time on a new host machine, you need to setup the docker repository. Then you can use the same repository for install and updates

  • Install packages to allow apt to use a repository over HTTPS:
sudo apt-get install apt-transport-https ca-certificates curl software-properties-common
  • Add Docker’s official GPG key :
curl -fsSL https://download.docker.com/linux/ubuntu/gpg | sudo apt-key add -
  • Verify that the key fingerprint is 9DC8 5822 9FC7 DD38 854A E2D8 8D81 803C 0EBF CD88
sudo apt-key fingerprint 0EBFCD88

pub   4096R/0EBFCD88 2017-02-22
      Key fingerprint = 9DC8 5822 9FC7 DD38 854A  E2D8 8D81 803C 0EBF CD88
uid                  Docker Release (CE deb) <docker@docker.com>
sub   4096R/F273FCD8 2017-02-22
  • use the below command to setup the stable repository
sudo add-apt-repository \
   "deb [arch=amd64] https://download.docker.com/linux/ubuntu \
   $(lsb_release -cs) \
   stable"
  • Update the apt package
sudo apt-get update
  • Install the latest / specific version of Docker with below commands
sudo apt-get install docker-ce   //for latest version
sudo apt-get install docker-ce=  //for specific version
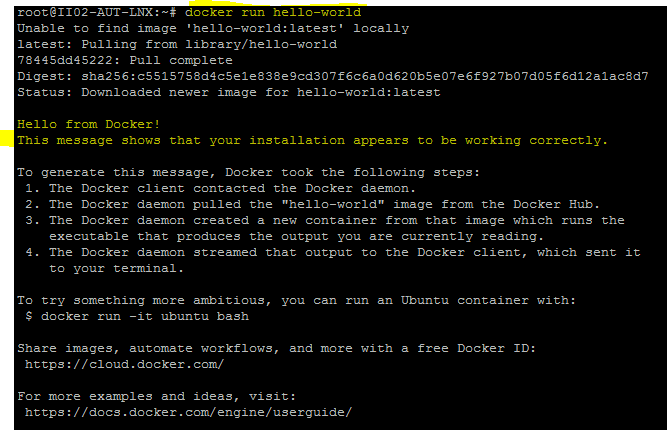
  • Verify that Docker CE is installed correctly by running a sample hello-world docker image-
sudo docker run hello-world
  • You should see something like below if your installation is successful and complete

docker-linux

If you guys face issues in installation , please mention in comments section.

In the next blog post , we would be learning docker terminology and different docker components

To know more in details, hands-on and for personal / corporate training please reach out to – gauravtiwari91@yahoo.com

Triggering Remote Jenkins jobs from another Jenkins

Continuous integration and delivery is a very crucial part of software life cycle for automatic execution or deployment of the code. Usually we have single Jenkins for deployment, automation scripts etc. But many times different teams like Ops, Dev and QA create their own Jenkins for their own purposes.

Now if we talk about integrating everything at same place, it is not feasible to manage and re-create jobs. So solution is to make communication between two Jenkins servers and trigger build accordingly.

In this blog post, I will talk about how can you trigger a JOB-A (on remote-jenkins ) from JOB-B (on local-jenkins). The real scenario of this would be; when we are trying to trigger an automation script on Jenkins1 after successful completion of code deployment on Jenkins2.

For understanding this let assumes few things below-

  • We have a local job-  Job-B (local-jenkins) on server local-jenkins:8080
  • We have a remote job – Job-A (remote-jenkins) on server – remote-jenkins:8080

Now we want to trigger Job-A from Job-B. For achieving this we need to install few plugins in our local Jenkins (from which we want to trigger the job- local-jenkins in this case) –

Go to manage-Jenkins->configure system->Parameterized Remote Trigger Configuration, and do configuration as stated below-

remotetrigger1

You can add many remote servers. Now you have to do following changes in your local Jenkins job i.e. Job B.

buildsteps

buildinfo

Now save the configuration of your job and build your local job i.e. Job-B. Console of local job looks like below- local job

Console of Remote job looks like below – remotejob

You can see it says that started by local-Jenkins. So it has triggered this job on remote Jenkins from local Jenkins.

Similarly you can link multiple jobs to be build across different Jenkins server. I hope now you can easily integrate multiple Jenkins. Please add comments in case of any issues encountered. 🙂


Shifting left with DevOps and Continuous Integration

Adopting Continuous delivery helps to achieve rapid application development throughout the software application life cycle. It is a methodology, a mindset change,a shift-left approach and a leadership practice to streamline manual processes and enforce consistency and repeat-ability in software delivery pipeline. This is about enhancing collaboration and shared matrices and processes across Developers, QA and Ops team.

Read time – 10 minutes

In order to establish a Continuous Delivery environment, the most important requirement is the implementation of an automated Continuous Integration (CI) System. The CI process involves all stages – right from code commits to a version control system (done on the CI server) that serves as a kick off for a build to compile, run tests, and finally package the code. DevOps is playing a major role in going towards defect-preventive approach.

This blog will demonstrate the steps and advantages of implementing a Continuous Integration System using Jenkins and a group of virtual machines. You can utilize your CI system for automatic infrastructure setup and execution of suitable automated scripts whenever a new build or commit happens in that automation script code.

Highlights

  1. Setting up a Jenkins Master machine
  2. Setting Jenkins slaves for distributed execution
  3. Creating new Jenkins job for new scripts
  4. Creating execution pipeline for automating the build steps
  5. Scheduling script execution


  • Setting up a Jenkins Master Machine – Installation of Jenkins is very easy; it is just about executing a jar file or executable. Once this is up, it can be accessed from any machine available on that network through a web browser. Jenkins Master is responsible for re-directing all commands and execution to Slave machines. For set up instructions, go through Setting up Jenkins in 5 minutes
  • Setting Jenkins Slave for distributed execution – Jenkins Slave machine can be a real machine, a virtual machine or a dockerized container which has capability of an operating system. Jenkins slave can also be set up by just executing a jar file and registering that machine as a slave against Master Jenkins machine. When Jenkins master receives instructions, it processes that and decides which script would be executed on which slave machine. So if multiple slaves are connected, execution can be done in distributed manner and will result in multi processing + multi threading of execution.
  • Creating new jobs for script execution – A job in Jenkins is about defining a series of action for successful execution of script. First it fetches the latest script code from sub-version, and then it builds that code on some selected slave or master (which is decided by Jenkins Master). Once the code is built on slave machine, Scripts get started and executed. usually, we use Selenium, Java and Maven for automated build process. Once a job is created, it has a web URL. This web URL is helpful in sharing execution results, build info etc.
  • Creating execution pipe line – Execution pipe line is a visual representation of different job executions in sequence. This helps in automating the whole process of script execution. So once all Jenkins jobs are set up, you can decide the order of their execution based on the type of script e.g. Smoke, Regression, release validation, web services test etc. So it creates a pipe line of execution which has a single trigger point. That trigger is initiated whenever a new build / release happen on platform or there is any requirement of executing it. Once a single job in this pipeline gets finished, it automatically triggers the next job in the pipe line. QA/Developer keeps getting the continuous feedback of automated results, which helps us in identifying the defects. Below diagrams represents a pipe line which shows headless scripts execution which is done using plugin – Build pipeline plugin

build-pipeline

  • Scheduling script execution – Jenkins job is that these can be scheduled for future executions and can provide results of nightly test build script executions. It helps a lot of time spent in manual triggering and monitoring of execution and enhance the automated process of script execution. There are two ways to do this-
  1. Jenkins plugin for scheduling – Build schedule plugin
  2. Select the option for build periodically in build steps and define a regular expression which is a 5 digits separated number define the execution timing and cycle. for e.g. below images showing that this job will be executed at 22:00 (10:00 PM) daily.schedule

I have setup this kind of infrastructure for automated test script execution, Next step is to do the same at build deployment level. I will keep posting more stuff related to Devops and continuous integration. Happy Testing 🙂

Continuous integration with Jenkins in 5 minutes

When we talk about continuous integration; there are many tools like Jenkins, TeamCity, Bamboo etc. But Jenkins is the most popular because of its numerous plugin and free style configurations for jobs. Jenkins is an open source continues integration tool, which can be used for various purpose as it provides numbers of Plugin. There are two methods for installation and set up of Jenkins-

1) JAVA Web Archive (JAVA War file)

2) Native package

In this blog, I will discuss in details about how you can do Jenkins setup in 5 mins. So be with me and follow below steps-

Jenkins Installation & Set Up-

1) Download the Jenkins.war file from the following URL-http://jenkins-ci.org/

2) JDK 1.5 or above should be installed and a JAVA_HOME variable path should be set in advance

3) Open cmd/bash/shell according to operating system-Windows/Linux/Mac

4)  Locate the folder where Jenkins war file is downloaded

5) Type java -jar jenkins.war and hit Enter

6) Now open browser and hit the URL- localhost:8080

7) If a Jenkins page is opened in browser, that means you have done Jenkins setup

Above steps are for setting up Jenkins. Now Jenkins provide many plugins for various purposes, so you can do other configurations according to your need

Integrating GitHub to Jenkins-

Purpose of this integration is to perform all Github related task using Jenkins. For doing this configuration GitHub should be installed in the system on which Jenkins is deployed.

Please follow following steps for integrating Github-

1) In the Jenkins web GUI, click on Manage Jenkins link and then Click on Manage Plugin

jenkins

managejenkins

2) In the Manage Plugins, click on Available and install following plugins-

  1. a) Github API Plugin
  2. b) Git Client Plugin
  3. c) Git Plugin
  4. d) Github Plugin


3) After the installation of above Plugins, Click on Configure System under Manage Jenkins page and set the Git.exe property to its exact path as you can see in screenshot-

git

The Git path shown in the image may vary form system to system configuration.

Note- Above option will be available only if all Git Plugins stated above are correctly installed

4) Save all the configuration settings by clicking on Save button.

Creation of New Job and setting up a Git repository- I will be demonstrating a Github integration for a test project where all the test scripts are on github and Jenkins would be responsible for checking out the scripts and executing scripts on the machine where Jenkins is deployed. Please refer to following steps to do above set up

1) Click on New Job link in the Jenkins Dashboard.

2) Create a free style Software project and click on OK button.

newjob

3) After creating the job click on Configure and select Git under Source Code Management option-

job2.png

Enter a Repository URL as seen in the screenshot, which will be a combination of Username, Password and Repository Name.

Enter a Branch Name if you want to check out the code from a specific branch. If the field left blank, it will refer to Master branch by default.

4)Under Build option select your preferred build method for script execution and write the command accordingly- Please refer to attach screenshot-

build1

build2.png

5) Save the configuration and click on Build Now, if the set up is done correctly your scripts/code starts executing

This is about how you can do quick setup using Jenkins war file. similarly you can do setup using native programs of Jenkins and can create Client-Server modal for same.

Happy Learning 🙂